Important syntax#
The world builder is using sphinx to generate the documentation. Sphinx accepts multiple variants of extended markdown, but in this project we are using myst. Below we list some common commands to use.
Note
Everything in this file will look like garbage in a regular markdown viewer, like if you’re viewing this on github. Viewing it on readthedocs will render everything properly.
Title#
Every page starts with a header for this file:
(part:dev_manual:chap:contribute_to_doc:sec:important_syntax)=
Important syntax
=====================================
Note that the first line contains a reference to this file that can be used to link to this file from other places of the documentation.
Text#
Put single asterisks (*) around text you want to italicize, but double asterisks around text you want to bold. If you want to highlight code you put single Grave Accent (`) around it. You can escape chacters with the backlash (), like so `not highlighted`, *not italic*, **not bold**.
Put single asterisks (*) around text you *want to italicize*,
but double asterisks around text you **want to bold**.
If you want to `highlight code` you put single Grave Accent (\`) around it.
You can escape chacters with the backlash (\\), like so \`not highlighted\`, \*not italic\*, \*\*not bold\*\*.
Headers#
Headers start with a # for level 1, ## for level 2, etc.
Header 2#
Header 3#
(header1)=
# Header 1

(header2)=
## Header 2

(header3)=
### Header 3
Links#
Links are written in the following way:
[link within this page](title)
[link to other page](part:dev_manual:chap:contribute_to_doc:sec:index)
[link to external website](https://github.com/GeodynamicWorldBuilder/WorldBuilder)
Admonitions#
Adding notes, warnings or and todos which stand out can be done with the following syntax:
:::{todo}
This is a `TODO` admonition.
:::
Todo
This is a TODO admonition.
:::{note}
This is a `note` admonition.
:::
Note
This is a note admonition.
:::{tip}
This is a `tip` admonition.
:::
Tip
This is a tip admonition.
:::{seealso}
This is a `seealso` admonition.
:::
See also
This is a seealso admonition.
:::{important}
This is an `important` admonition.
:::
Important
This is an important admonition.
:::{warning}
This is a `warning` admonition.
:::
Warning
This is a warning admonition.
:::{attention}
This is an `attention` admonition.
:::
Attention
This is an attention admonition.
:::{danger}
This is a `danger` admonition.
:::
Danger
This is a danger admonition.
:::{error}
This is an `error` admonition.
:::
Error
This is an error admonition.
Figures#
Adding figures looks similar to notes and todo’s:
:::{figure} ../../../../doc/sphinx/_static/images/user_manual/basic_starter_tutorial/BST_19.png
:name: BST_19_synatx
:alt: Basic Starter Tutorial section 19 highres result.
:align: center

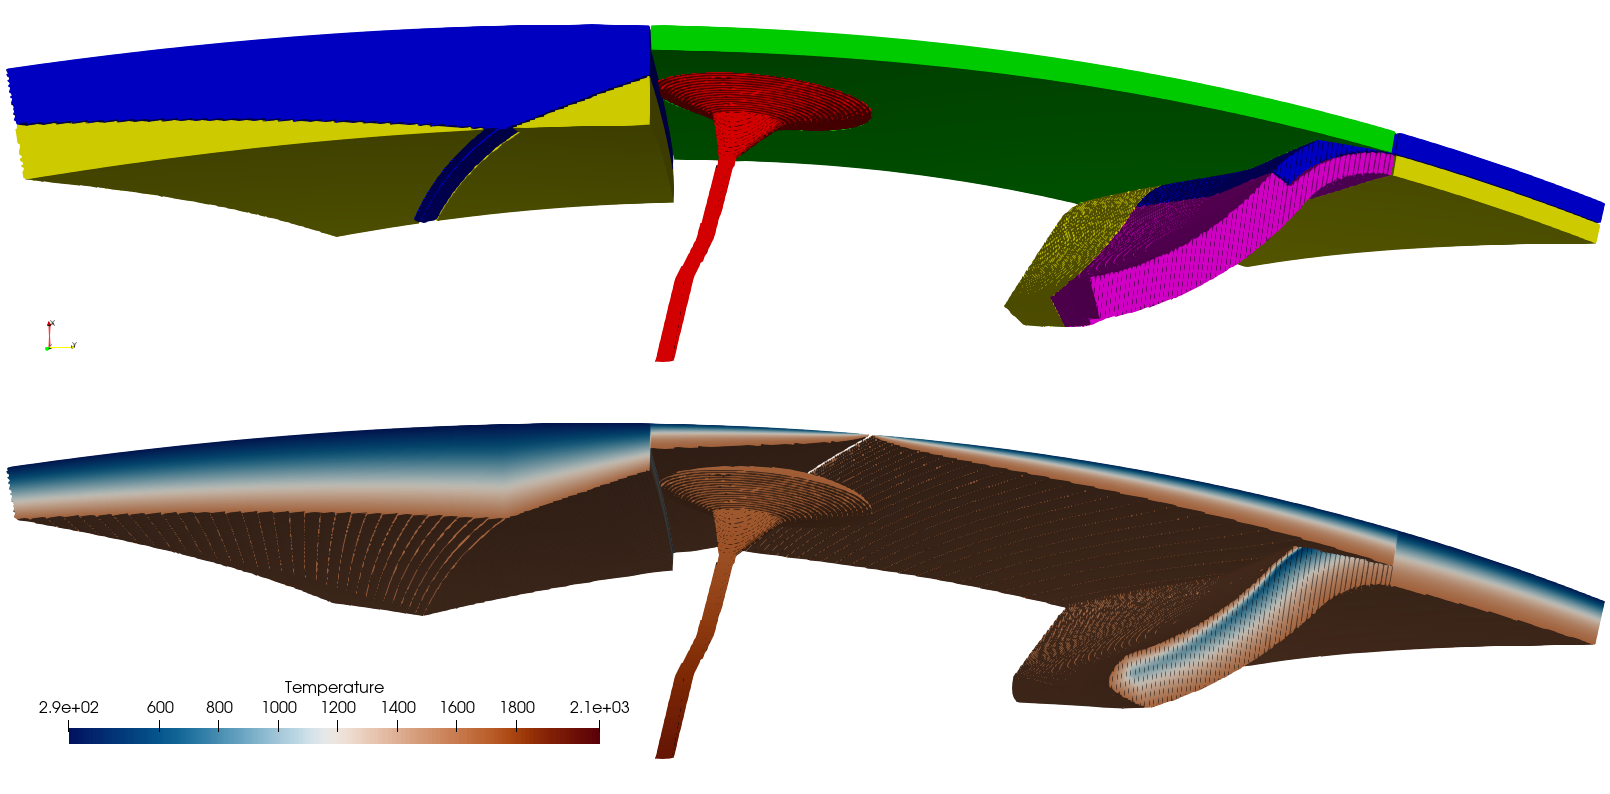
Basic Starter Tutorial section 19 high resolution result. This has 8 times the resolution than the grid file above. Note that you can see the Earth's curvature!
:::

Basic Starter Tutorial section 19 high resolution result. This has 8 times the resolution than the grid file above. Note that you can see the Earth’s curvature!#
Code blocks#
Creating code blocks is similar to making notes or todos. Instead of {note} you need to use {code-block} and then the name of the language which the code should be colored by. For example for json, you would use:
:::{code-block} json
:lineno-start: 1
:emphasize-lines: 3,4
 {
    "version":1.0,
    "coordinate system": {"model":"cartesian"},
 }
:::
The lines starting with a colon (:) specify certain parameters which can be set, such as showing line numbers and what number they need to start at (lineno-start: 1) and what lines to mark (emphasize-lines: 3,4).
1 {
2    "version":1.0,
3    "coordinate system": {"model":"cartesian"},
4    "Features":[]
5 }
If you need to wrap a code block in a code block, you just use more : on the outside:
::::{code-block} md
:::{code-block} json
:lineno-start: 1
:emphasize-lines: 3,4
 {
    "version":1.0,
    "coordinate system": {"model":"cartesian"},
 }
:::
::::
Including code from files can be done in the following way:
:::{literalinclude} ../../_static/gwb_input_files/BST_02_minimal_box.wb
:language: json
:lineno-start: 1
:::
1{
2    "version": "1.0",
3    "features":[]
4 }
Dropdown#
::::{dropdown} Click me to open a dropdown box
:name: this:is:my:label

This text is only shown when you click on the dropdown button.
::::
Click me to open a dropdown box
This text is only shown when you click on the dropdown button.
Grids#
Girds work through multiple layers, like a code-block in a code block:
::::{grid} 3
:::{grid-item-card} BST_19_spherical_models.wb
:link: ../../_static/gwb_input_files/BST_19_spherical_models.wb
:::
:::{grid-item-card} BST_19_spherical_models.grid
:link: ../../_static/gwb_input_files/BST_19_spherical_models.grid
:::
:::{grid-item-card} Paraview Spherical state file
:link: ../../_static/paraview_state_files/BST_spherical.pvsm
:::
::::
Tabs#
::::{tab-set}
:::{tab-item} tab 1
:sync: tab1
 tab 1
:::

:::{tab-item} tab 2
:sync: tab2

tab 2
:::
::::
tab 1
tab 2
Citations#
Traditional citation {cite}`Fraters_Thieulot_etal_2019`.
Citation as noun {cite:t}`Fraters_Thieulot_etal_2019`.
Use a comma for multiple, like {cite:t}`Fraters_Thieulot_etal_2019,Kronbichler_Heister_etal_2012,Heister_Dannberg_etal_2017`.
becomes
Traditional citation [4]. Citation as noun Fraters et al. [4]. Use a comma for multiple, like (Fraters et al. [4], Heister et al. [5], Kronbichler et al. [6].
If the paper you wish to cite is not already in references.bib, you will need to add its bibtex entry. Please format the citation tag as:
firstauthor_yearfor one authorfirstauthor+secondauthor_yearfor two authorsfirstauthor+secondauthor_yearfor three authorsfirstauthor+secondauthor_etal_yearfor more than two authors
where firstauthor and secondauthor refer to the last names of the authors.
Math#
Inline math works just like in latex. Use dollar signs to put stuff like $\eta_r(z)$ in a sentence. That’s:
Use dollar signs to put stuff like $\eta_r(z)$ in a sentence.
Be aware that not all latex packages are known by Sphinx, so some commands will need to be reformatted (i.e., \num{4e5} needs to be rewritten as 4\times 10^{5}.)
For math blocks:
:::{math}
:label: eqn:one:two
F = m a
:::
becomes
Refer to the labeled equation like {math:numref}`eqn:one:two`.
Refer to the labeled equation like (1). (The label is not necessary if the equation doesn’t have one, in which case it would be formatted like):
The split environment is built into the math directive; which allows you to use one align operator (&).
:::{math}
:label: eq:aligned
  -\nabla \cdot \left[2\eta
   \left(\varepsilon(\mathbf u) - \frac{1}{3}(\nabla \cdot \mathbf u)\mathbf 1\right)\right]
   + \nabla p' &=  -\bar \alpha \bar\rho T' \mathbf g \qquad \textrm{in $\Omega$},  \\
  \nabla \cdot (\bar\rho \mathbf u) &= 0  \qquad  \textrm{in $\Omega$}.
:::
becomes:
If you require more than one alignment character you need to start and end an additional aligned environment. Be sure to add the same number of align operators (&) to each line and use \\ to denote a new line.
:::{math}
:label: eq:aligned
\begin{aligned}
  -\nabla \cdot \left[2\eta
   \left(\varepsilon(\mathbf u) - \frac{1}{3}(\nabla \cdot \mathbf u)\mathbf 1\right)\right]
   + \nabla p' &=  -\bar \alpha \bar\rho T' \mathbf g & \qquad  & \textrm{in $\Omega$},  \\
  \nabla \cdot (\bar\rho \mathbf u) &= 0  & \qquad  & \textrm{in $\Omega$}.
\end{aligned}
:::
becomes:
Todo
Replace equations with more appropriate equations for the World Builder. Maybe the MKenzie slab temperature equations?
Footnotes#
Here's how you put a footnote[^footnote1] in a sentence.
Here’s how you put a footnote[1] in a sentence (see the bottom of this file).
[^footnote1]: And here's what the footnote says (put this at the very bottom of the document)
